|
|
|
|
Work in progress: *UPDATED PIC'S*, by bobbyt23 on May 15, 2008 22:33:04 GMT 1, Thought I'd show the process of a new piece I'm doing. Not 100% sure how well it'll turn out but thought I'd take the plunge and show you how I get on  It's called "Wet Floor" and is a satirical look at the compensation culture we all live in - "It's never you're fault, there's always someone else to blame"  As you can hopefully see, it's a 3 layer stencil and gonna be quite large - 75cm x 100cm.    
HaHa. Like the idea. Amusing. ;D ;D
Look forward to see the finished thing.
Thought I'd show the process of a new piece I'm doing. Not 100% sure how well it'll turn out but thought I'd take the plunge and show you how I get on It's called "Wet Floor" and is a satirical look at the compensation culture we all live in - "It's never you're fault, there's always someone else to blame" As you can hopefully see, it's a 3 layer stencil and gonna be quite large - 75cm x 100cm. HaHa. Like the idea. Amusing. ;D ;D Look forward to see the finished thing. |
|
|
|
Work in progress: *UPDATED PIC'S*, by Oliver Winconek on May 16, 2008 8:03:21 GMT 1, Nice work, love the concept. I look forward to seeing the finished thing. Will you be doing prints or will it just be a wall piece?
Oliver
Nice work, love the concept. I look forward to seeing the finished thing. Will you be doing prints or will it just be a wall piece?
Oliver
|
|
GVD
Artist
New Member

Posts • 718
Likes • 2
April 2007
|
Work in progress: *UPDATED PIC'S*, by GVD on May 16, 2008 11:15:07 GMT 1, Looks cool, cant wait to see the finished piece  . .
But why didnt you seperate the colours in photoshop? So with every layer you just print the part you need cut, it saves inkt haha  . .
Also the next time you do a multi layer stencil you can make it so much easier by making some registration marks.
Just put some + in a couple of places around the stencil (not to close to the stencil), and print it and cut it on every layer.
When you do the first layer of you stencil, place it the right way on the canvas, put some tape where the +'s are and spray it.
To get the next couple of layers right all you have to do is place the +'s on the previous ones.
Hope that helps!
Glenn
Looks cool, cant wait to see the finished piece . But why didnt you seperate the colours in photoshop? So with every layer you just print the part you need cut, it saves inkt haha . Also the next time you do a multi layer stencil you can make it so much easier by making some registration marks. Just put some + in a couple of places around the stencil (not to close to the stencil), and print it and cut it on every layer. When you do the first layer of you stencil, place it the right way on the canvas, put some tape where the +'s are and spray it. To get the next couple of layers right all you have to do is place the +'s on the previous ones. Hope that helps! Glenn |
|
Nicone
Artist
New Member
Posts • 217
Likes • 20
October 2007
|
Work in progress: *UPDATED PIC'S*, by Nicone on May 16, 2008 18:15:37 GMT 1, Love the idea...
Also like the pieces of advise from you Glenn... Really interesting tips.
Love the idea...
Also like the pieces of advise from you Glenn... Really interesting tips.
|
|
Ged
Artist
New Member
Posts • 704
Likes • 1
February 2008
|
Work in progress: *UPDATED PIC'S*, by Ged on May 16, 2008 18:43:40 GMT 1, Looks cool, cant wait to see the finished piece . But why didnt you seperate the colours in photoshop? So with every layer you just print the part you need cut, it saves inkt haha . Also the next time you do a multi layer stencil you can make it so much easier by making some registration marks. Just put some + in a couple of places around the stencil (not to close to the stencil), and print it and cut it on every layer. When you do the first layer of you stencil, place it the right way on the canvas, put some tape where the +'s are and spray it. To get the next couple of layers right all you have to do is place the +'s on the previous ones. Hope that helps! Glenn
Thanks very much for the advice Glenn. I'll give the reg marks a go - at the moment I just use my eye to line them up which works ok but yeh, the reg marks will make it easier. But in regards to the separating the colours bit - not sure how to do that, will look into it. Cheers
Thanks for all the kind words guys, really appreciate it.
Not sure about a print yet. I'll see how it looks when finished and see whether it'll work as a print. Going to do a few tests first i.e. brown paper, canvas, card etc etc. Just experimenting with the idea at the moment.
I'll post more photo's asap.
Looks cool, cant wait to see the finished piece . But why didnt you seperate the colours in photoshop? So with every layer you just print the part you need cut, it saves inkt haha . Also the next time you do a multi layer stencil you can make it so much easier by making some registration marks. Just put some + in a couple of places around the stencil (not to close to the stencil), and print it and cut it on every layer. When you do the first layer of you stencil, place it the right way on the canvas, put some tape where the +'s are and spray it. To get the next couple of layers right all you have to do is place the +'s on the previous ones. Hope that helps! Glenn Thanks very much for the advice Glenn. I'll give the reg marks a go - at the moment I just use my eye to line them up which works ok but yeh, the reg marks will make it easier. But in regards to the separating the colours bit - not sure how to do that, will look into it. Cheers Thanks for all the kind words guys, really appreciate it. Not sure about a print yet. I'll see how it looks when finished and see whether it'll work as a print. Going to do a few tests first i.e. brown paper, canvas, card etc etc. Just experimenting with the idea at the moment. I'll post more photo's asap. |
|
|
|
GVD
Artist
New Member
Posts • 718
Likes • 2
April 2007
|
Work in progress: *UPDATED PIC'S*, by GVD on May 16, 2008 20:38:33 GMT 1, Thanks very much for the advice Glenn. I'll give the reg marks a go - at the moment I just use my eye to line them up which works ok but yeh, the reg marks will make it easier. But in regards to the separating the colours bit - not sure how to do that, will look into it. Cheers
No problem i always got so annoyed before i figured out registration marks ;D,
I dont know what program you use to make the images, but in photoshop you have the 'magic wand' option. 
Just choose that one, set the tolerance low, dont click contiginous and select the colours you want to delete and delete them by pressing Delete hehe.
hope that helps,
Glenn
Thanks very much for the advice Glenn. I'll give the reg marks a go - at the moment I just use my eye to line them up which works ok but yeh, the reg marks will make it easier. But in regards to the separating the colours bit - not sure how to do that, will look into it. Cheers No problem i always got so annoyed before i figured out registration marks ;D, I dont know what program you use to make the images, but in photoshop you have the 'magic wand' option. Just choose that one, set the tolerance low, dont click contiginous and select the colours you want to delete and delete them by pressing Delete hehe. hope that helps, Glenn |
|
Ged
Artist
New Member
Posts • 704
Likes • 1
February 2008
|
Work in progress: *UPDATED PIC'S*, by Ged on May 16, 2008 21:46:03 GMT 1, Yeh, I've used the wand before (in Photoshop) for various things but never thought about using it to separate colours. Thanks for the tip.
Ged
Yeh, I've used the wand before (in Photoshop) for various things but never thought about using it to separate colours. Thanks for the tip.
Ged
|
|
Ged
Artist
New Member
Posts • 704
Likes • 1
February 2008
|
Work in progress: *UPDATED PIC'S*, by Ged on May 20, 2008 17:30:45 GMT 1, Here's the test piece I just finished today:
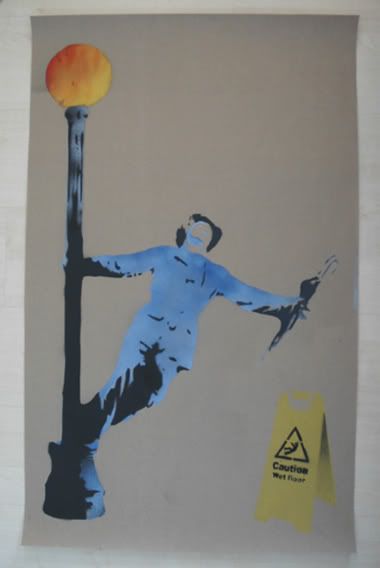
Going to alter the stencils slightly so his face is clearer. Will also try on a white background although I think the brown paper works well.
More pics can be found on my Flickr page.
www.flickr.com/photos/paper_windows/
Here's the test piece I just finished today: Going to alter the stencils slightly so his face is clearer. Will also try on a white background although I think the brown paper works well. More pics can be found on my Flickr page. www.flickr.com/photos/paper_windows/ |
|
Michael Jacob
Artist
Junior Member
Posts • 2,049
Likes • 29
October 2006
|
Work in progress: *UPDATED PIC'S*, by Michael Jacob on May 21, 2008 14:46:43 GMT 1, Looks great!
To add to GVDs comment, when you select a color, then also select similar. It will grap all similar colors.
Keep up the good stuff!
Looks great!
To add to GVDs comment, when you select a color, then also select similar. It will grap all similar colors.
Keep up the good stuff!
|
|


 .
.  .
.